Monday, December 10, 2007
DS1820 Based High Precision Temperature Indicator
Monday, November 19, 2007
Sending Data From The PC to a Microcontroller
So lets start off with designing a communications protocol. From VB we will send an ASCII 255, as a synch byte, and the on/off state (0 or 1). The microcontroller will wait for two (2) bytes of data. After these two bytes of data are received, it will then either switch on/off the LED
Visual Basic at PC side
To get started open Visual Basic.
Start a new Standard EXE.
Next go to the Project | Components... menu
Check the Microsoft Comm control 6.0.
Click OK.
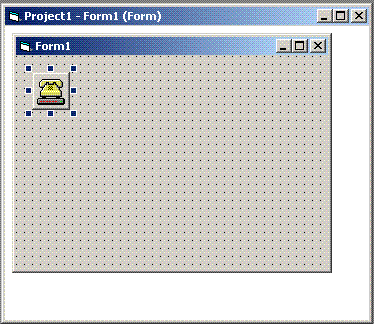
Next double-click on the yellow phone in the toolbar to add the MSComm control to your form.

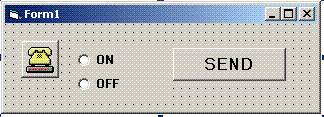
Now add two option buttons from the tool bar name as "opton" and "optoff", change the caption to ON and OFF for both buttopns.
Now add a command button named cmdsend from the tool bar, and chage the caption to "SEND"
On To The Code
Now that the form is set up and ready to go, we need to start adding our code to the project. The user will select a pin state from option button, and then click cmdSend to send the data to the microcontroller. So first of all we need to set up the MSComm control, and select one of the pin states to start with. So lets add the following code to our form...

Private Sub Form_Load()
On Error Resume Next
'use comm port 1
MSComm1.CommPort = 1
' 9600 baud, no parity, 8 data bits, 1 stop bit
MSComm1.Settings = "9600,N,8,1"
' Disable DTR
MSComm1.DTREnable = False
'open the port
MSComm1.PortOpen = True
End Sub
Now we just need to add the code to send the data. When the user presses cmdSend, we need to do three things.
Get the pin state...
Send the data...
Now lets put it all together and send the data when we press the cmdSend button...
Private Sub cmdsend_Click()
Dim LED As Long
' Get LED State
If opton.Value = True Then
LED = 0
Else
LED = 1
End If
' Send Out Data
MSComm1.Output = Chr$(255) & Chr$(LED)
End Sub
So we sent out the synch byte (255),followed by the LED state.
Finally we need to close the comm port when the VB project unloads so...
Private Sub Form_Unload(Cancel As Integer)
MSComm1.PortOpen = False 'Close the COMM port
End Sub
That's all at the PC side
Microcontroller Side
Program the MIcrocontroller with the following code
ORG 00H ; Reset
MOV TMOD,#20H ;enable timer1, mode 2 (auto reload)
MOV TH1,#0FDH ;9600 Baud rate
MOV SCON,#50H ;8 bit, 1 stop bit, REN enabled
SETB TR1
HERE:JNB RI,HERE ;wait for character to come in
MOV A,SBUF ;get data in A
CJNE A,#0FFH,DOWN ;chk if the char is synch byte ie.offh or 255
;if not jump to clear RI
CLR RI ;get ready to get next byte
WAIT:JNB RI,WAIT ;wait for character to come in
MOV A,SBUF ;get data in A
CJNE A,#00H,NXT ;chk if the char is 0
CLR P2.0 ;switch on LED
SJMP DOWN ;jump to clear RI
NXT:CJNE A,#01H,DOWN ;chk if the char is 1
SETB P2.0 ;switch off LED
DOWN:CLR RI ;get ready to get next byte
SJMP HERE ;keep getting the data
Now run the VB project, select either ON or OFF, and press send. You should see the LED turn ON when you send a ON command, and turn OFF when you send a OFF command.
Visit http://www.8051projects.info for more details
.
Wednesday, October 31, 2007
Digital IC Tester for 74 series using 89C55 Microcontroller
Monday, September 24, 2007
Voice Ineractive System For College Automation (AT89C2051 + VB)
Now-a-days every institution needs automation. As a part of college automation, we have decided to do a project “Voice Interactive System for College Automation”. Our project allows the user to know the student’s attendance and marks quickly through the telephone line without the intention of the college authority. In the hardware side embedded system has been used. A 20 pin microcontroller 89C2051 is used because of its compatibility with our hardware. This microcontroller controls the whole hardware. Telephone line is used for communication purpose. Visual Basic has been used for software programming. Presentation in the class and outcome of the university are made reachable to the parents by our project. It will be very obliging to the parents to be acquainted with their son’s/daughter’s recital in the college.
Tuesday, September 11, 2007
Free 8051 / 8052 Microcontroller Projects
2. Automatic College Bell (AT89S8252 & DS1307)
3. Automatic plant Irrigation (AT89C2051)
4. Automatic Room light Controller with Visitor Counter (AT89S52)
5. BIOMEDICAL MONITORING SYSTEM (AT89C2051 + TX/RX)
6. Device Controlling through PC (Visual Basic)
7. Digital Calendar (AT89C2051)
8. Digital Countdown Timer (AT89C2051)
9. Digital Visitor Counter (AT89C2051)
10. DS1620 Based Temperature Controller (AT89S52)
11. Electronic Voting Machine (AT89S8252)
12. Electronics Components Tester (AT89C52)
13. Fire Fighting Robot (AT89S52)
14. Gates Emulator (AT89C2051)
15. Home Security System(AT89S52)
16. Infrared Interruption counter (AT89C2051)
17. InfraRed Remote Switch (6 devices + 1 fan) -AT89S52
18. InfraRed Remote Switch (AT89C2051)
19. IVRS For College Automation (AT89C2051 + VB)
20. Line Following Robot (AT89C2051)
21. Microcontroller Based Caller ID (AT89C2051)
22. Microcontroller Based Digital code Lock (AT89C2051)
23. Multipattern Running Lights (AT89C2051)
24. Parallel Telephone with auto secrecy (AT89C2051)
25. Password Based Door Locking (AT89C2051)
26. PC BASED DATA LOGGER (AT89S52 + VB)
27. PC Based GPS28. PC Based Robot (AT89C2051)
29. PC -MC communication (AT89C2051 + Tx/Rx)
30. Prepaid Energy Meter (AT89S52)
31. REMOTE CONTROL VIA INTERNET (AT89S52 + Ethernet Adaptor)
32. Remote Controlled Digital Clock with DS1307 & AT89C2051
33. RF Based Remote control (AT89C2051)
34. RFID Based Attendance System (AT89S52 + RFID)
35. RFID Based Security System (AT89S52 + RFID)
36. SECURED WIRELESS DATA COMMUNICATION (AT89S52)
37. SMS based Device Switching (ATmega8515 + Nokia 5110 Mobile)
38. SMS through Telephone (AT89S8252)
39. Solar tracking System (AT89C52)
40. Telephone controlled Remote switch (AT89C2051)
41. Temperature controlled Fan (AT89S52)
42. TIME OPERATED ELECTRICAL APPLIANCE CONTROLLING SYSTEM
43. Traffic Light Controller (AT89C2051)
44. Two Line Intercom (AT89C2051)
45. Voice Ineractive System For College Automation (AT89C2051 + VB)
Digital Calendar (AT89C2051)
This Project Digital Calendar using Microcontroller is an advanced digital calendar, which displays the Date, Day, Month over the LED display. It has an 8 bit Microcontroller which runs on the Program embedded on its ROM. Separate LED’s are provided for the date, day, and month. The system has an battery backup so that it can run over all the time even during the power failure. Totally there are 31 LED’s for indicating the date and 12 LED’s for indicating the Month and 7 LED’s to indicate the day. All the above systems are controlled by the Microcontroller. In our project we are using the popular 8 bit microcontroller AT89C2051. It is a 20 pin microcontroller.
http://www.8051projects.info/proj.asp?ID=66
BIOMEDICAL MONITORING SYSTEM (AT89C2051 + TX/RX)
In spite of the improvement of communication link and despite all progress in advanced communication technologies, there are still very few functioning commercial wireless monitoring systems, which are most off-line, and there are still a number of issues to deal with. Therefore, there is a strong need for investigating the possibility of design and implementation of an interactive real-time wireless communication system. In our project, a generic real-time wireless communication system was designed and developed for short and long term remote patient-monitoring applying wireless protocol. The primary function of this system is to monitor the temperature and Heart Beat of the Patient and the Data collected by the sensors are sent to the Microcontroller. The Microcontroller transmits the data over the air. At the receiving end a receiver is used to receive the data and it is decoded and fed to Microcontroller, which is then displayed over the LCD display. If there is a dangerous change in patient's status an alarm is also sounded.
http://www.8051projects.info/proj.asp?ID=48
Automatic Room light Controller with Visitor Counter (AT89S52)
This Project “Automatic Room Light Controller with Visitor Counter using Microcontroller” is a reliable circuit that takes over the task of controlling the room lights as well us counting number of persons/ visitors in the room very accurately. When somebody enters into the room then the counter is incremented by one and the light in the room will be switched ON and when any one leaves the room then the counter is decremented by one. The light will be only switched OFF until all the persons in the room go out. The total number of persons inside the room is also displayed on the seven segment displays. The microcontroller does the above job. It receives the signals from the sensors, and this signal is operated under the control of software which is stored in ROM. Microcontroller AT89S52 continuously monitor the Infrared Receivers, When any object pass through the IR Receiver's then the IR Rays falling on the receiver’s are obstructed , this obstruction is sensed by the Microcontroller
http://www.8051projects.info/proj.asp?ID=39